Purim is a lesser-known holiday among non-Jews, but it's arguably the most fun holiday in our repertoire. I have fond memories of dressing up as Queen Esther to go to temple and enthusiastically boo'ing and shaking groggers during the service before adjourning to a mini carnival of sorts.
(The story of Purim is fairly short and Wikipedia does a great job explaining it. Click here to read the story, and here to read about how it's celebrated.)
It's been years since I've done anything for Purim, but this year I wanted to try my hand at making hamantaschen, the iconic triangular cookie meant to represent Haman's hat (or pockets, or ears, or...other body parts, depending on who you listen to).
Hamantaschen are notoriously tricky, often exploding in the oven due to compromised folds or overfilling. I also haven't eaten a hamantaschen (gluten free or otherwise) since childhood, so I had no idea what it should taste like. I vaguely remember eating a fig one as a kid and finding it bland and gross.
I found this recipe from The Nosher, which is kind of cheaty and therefore perfect for me. Apparently using yellow cake mix is a great shortcut that makes for sturdy dough that holds its integrity (and its fillings) in the oven.
I opted for raspberry jam (particularly this brand because of its alleged history, which I've shared below) and Nutella for fillings. If the cookie was bland like I remembered it, I wanted something very sweet and delightful in the center.
So, without further ado...here's the recipe!
Prep: Preheat your oven to 375°F and line a cookie sheet with parchment paper. Set up your mise en place.
Step 1: Make the dough. This is as easy as can be. You just dump all the ingredients (except the fillings, of course) into a bowl and beat them with a paddle attachment until they loosely come together. I used my stand mixer and it took no time at all.
I've never worked with such a crumbly dough, so I was nervous at first, but it quickly came together into a ball with some gentle kneading.
Step 2: Divide the dough. I broke my dough-ball into four equal-ish chunks. Because my workspace was small, it made sense to avoid rolling out the entire thing in one go.
Step 3: Roll & cut. Most recipes, including the one I'm working off of, call for rolling the dough out to 1/8 inch. I definitely could have gone a bit thinner than I did, and next time I want to spend over an hour making cookies, I will.
I used the rim of a pint glass (my 3rd place AG award from the Howl at the Moon 5k eons ago) to cut the circles out. Place the circles under a damp kitchen towel as you work, so they stay moist. Re-incorporate your scraps of dough back into a ball and keep rolling and cutting until you have all your circles.
I ended up with exactly 6 circles per quarter of dough, but if I had rolled it thinner, I could have gotten more.
Step 4: Fill, shape, & chill. Work with one cookie at a time. Fill your circle of dough with 1 tsp of filling. Fold the top two edges of the circle together to form a point at the top. I recommend folding the right side over the left.
This is where a small bowl of water comes in handy. I dipped my finger in the water and used it to seal the folds, as well as to smooth together any bits of dough that cracked. (Thinner dough won't crack as much, but like I said, I didn't roll these thin enough.)
Fold the bottom edge of the circle up, tucking the left corner under the existing flap. You know you've folded it correctly if all your edges have one corner under and one over, like when you're trying to reuse a really great cardboard box but don't want to tape the top.
I moved each finished cookie back under the damp towel until all six from the batch were done, then moved them to the cookie sheet, which I stuck in the fridge while I rolled out and completed the next batch. This recipe claims refrigerating isn't necessary with the cake mix, but it's better to be safe than sorry!
 |
| It took me awhile to figure out the right way to fold these, so some of them aren't correct. But none of them exploded in the oven! |
Step 5: Bake. I made sure my last batch had at least five minutes in the fridge before I moved the cookie sheet to the oven. I baked them for 12 minutes. They didn't really turn golden, but the edges and bottom did brown a bit.
 |
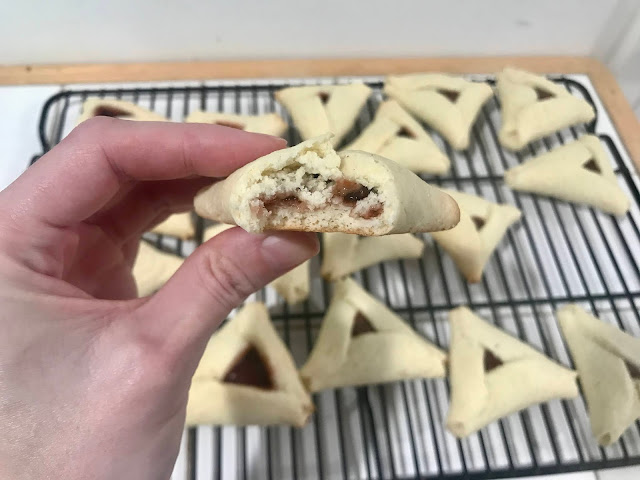
| I couldn't decide how open I wanted the hamantaschen to be, and next time I think I'll leave them more open so the filling is more visible. |
That's it!
The cookies turned out nicely. The cookie itself is firm, crisp, and a bit crumbly. It's definitely a drier cookie, and it turned out sweet, but not too sweet. It's definitely not bland like I remember from childhood. The fillings, of course, offer a nice extra punch of sweetness as well.
Next time I may give them a sprinkle of sugar on top before baking, to give them a nice crust à la my apple pie.
Honestly, they're pretty great. This is a super simple but time-intensive recipe. I've never made anything that involved really shaping dough like this, so it was a fun, new endeavor for me. I like learning to make foods from my culture, and this is another I can add to my list!
ABK


What a story about the preserves. You are really such a good cook, and now baker! Is there anything you can't do?!?
ReplyDelete